弹窗
UIAlertView的历史
随着苹果上次iOS5的发布,对话框视图样式出现在了我们面前,直到现在它都没有发生过很大的变化。对于每个object-C的程序员来说是用得较多的选择弹框。而在iOS8上这个对话框发生了变化,诞生出了新的控件UIAlertController,继承于UIViewController的。
UIAlertView的使用
//UIAlertView初始化
 UIAlertView *alert = [[UIAlertView alloc]initWithTitle:@"提示" message:@"提示内容" delegate:self cancelButtonTitle:@"取消" otherButtonTitles:@"确定", nil];
    [alert show];

#pragma mark - <UIAlertViewDelegate>
- (void)alertView:(UIAlertView *)alertView clickedButtonAtIndex:(NSInteger)buttonIndex
{
    NSLog(@"---%zd", buttonIndex);
}
UIAlertController的使用
UIAlertController只能在iOS8以上使用,所以要慎用。
在iOS8中,UIAlertController在功能上是和UIAlertView以及UIActionSheet相同的,UIAlertController以一种模块化替换的方式来代替这两货的功能和作用。是使用对话框(alert)还是使用上拉菜单(action sheet),就取决于在创建控制器时,您是如何设置首选样式的。
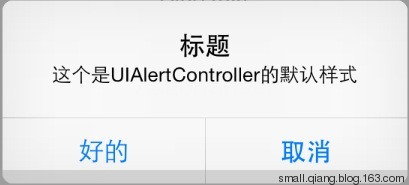
一个简单的对话框例子
//第三个参数指定弹框样式
 UIAlertController *alertController = [UIAlertController alertControllerWithTitle:@"标题" message:@"这个是UIAlertController的默认样式" preferredStyle:UIAlertControllerStyleAlert];
同创建UIAlertView相比,我们无需指定代理,也无需在初始化过程中指定按钮。不过要特别注意第三个参数,要确定您选择的是对话框样式还是上拉菜单样式。
通过创建UIAlertAction的实例,您可以将动作按钮添加到控制器上。UIAlertAction由标题字符串、样式以及当用户选中该动作时运行的代码块组成。通过UIAlertActionStyle,您可以选择如下三种动作样式:常规(default)、取消(cancel)以及警示(destruective)。为了实现原来我们在创建UIAlertView时创建的按钮效果,我们只需创建这两个动作按钮并将它们添加到控制器上即可。
UIAlertAction *cancelAction = [UIAlertAction actionWithTitle:@"取消" style:UIAlertActionStyleCancel handler:nil];
UIAlertAction *okAction = [UIAlertAction actionWithTitle:@"好的" style:UIAlertActionStyleDefault handler:^(UIAlertAction *action) {

NSLog(@"好的");

}];

[alertController addAction:okAction];

[alertController addAction:cancelAction];
添加相应按钮后,只需要通过block的方式处理点击时要触发的事件了,不需要再用代理的方式,判断点击的index来再做后续的事件了。然后要show出来就像切换界面一样就可以了。
[self presentViewController:alertController animated:YES completion:nil]
效果和之前是一样的
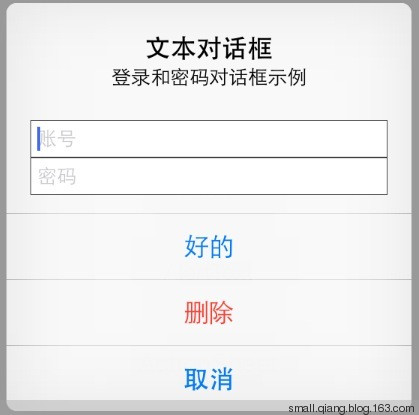
带输入框的对话框
有时候我们需要一个带输入框的对话框,在新的API中也是比较容易就可以实现了,UIAlertController本身就自带了方法去添加,也是通过block的方式对textField进行一些属性上的修改。
  [alertController addTextFieldWithConfigurationHandler:^(UITextField *textField){
textField.placeholder = @"账号";

}];

[alertController addTextFieldWithConfigurationHandler:^(UITextField *textField) {

textField.placeholder = @"密码";

textField.secureTextEntry = YES;

}];
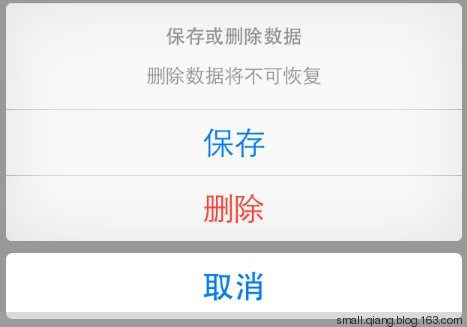
上拉菜单
上拉菜单当需要给用户展示一系列选择的时候,上拉菜单就能够派上大用场了。和对话框不同,上拉菜单的展示形式和设备大小有关。在iPhone上(紧缩宽度),上拉菜单从屏幕底部升起。在iPad上(常规宽度),上拉菜单以弹出框的形式展现。创建上拉菜单的方式和创建对话框的方式非常类似,唯一的区别是它们的形式。
UIAlertController *sheetController = [UIAlertController alertControllerWithTitle:@"保存或删除数据" message:@"删除数据将不可恢复" preferredStyle:UIAlertControllerStyleActionSheet];

UIAlertAction *saveAction = [UIAlertAction actionWithTitle:@"保存" style:UIAlertActionStyleDefault handler:^(UIAlertAction *action) {

NSLog(@"保存");

}];

UIAlertAction *deleteAction = [UIAlertAction actionWithTitle:@"删除" style:UIAlertActionStyleDestructive handler:^(UIAlertAction *action) {

NSLog(@"删除");

}];

UIAlertAction *cancelAction = [UIAlertAction actionWithTitle:@"取消" style:UIAlertActionStyleCancel handler:nil];

[sheetController addAction:saveAction];

[sheetController addAction:deleteAction];

[sheetController addAction:cancelAction];

[self presentViewController:sheetController animated:YES completion:nil];
就这样我们就可以创建一个上拉菜单了。
注意事项
UIAlertController的使用基本上介绍到这里,然后下面说一下要注意的东西。如果上拉菜单中有“取消”按钮的话,那么它永远都会出现在菜单的底部,不管添加的次序是如何。原先的UIAlertView和UIActionSheet类仍然可以在iOS8中继续使用,所以没有必要急于更换代码,不然在iOS8以下的设备上使用了将会导致crash。